本文记录一些建站排障与美化经验,非科班出身,仅作记录用
图床搭建
什么是图床?
图床工具(Image Hosting)是一种将图片文件上传到互联网,并提供图片链接的工具。通过图床工具,用户可以将自己的图片托管到第三方服务器上,以获得更好的可靠性和稳定性。
解决方案?
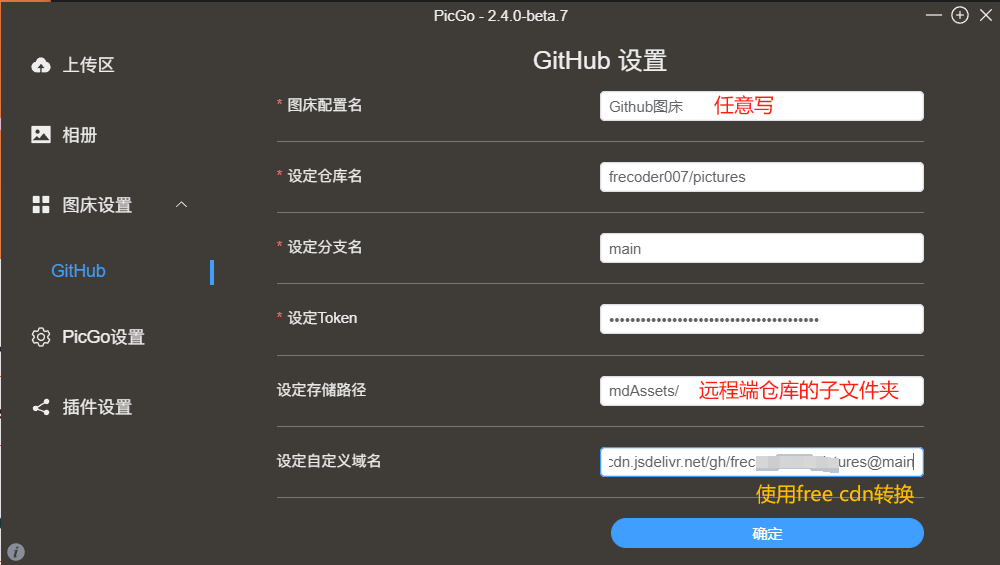
以Github公开库作为服务器,采用PicGo + github +Typora作为图片解决方案。
参考PicGo官方指导文档 ,我们将PicGo的配置设置如下。其中,自定义域名采用了免费的cdn进行转换:https://www.jsdelivr.com/github,转换后格式如图
此时上传仍会报错如下,检查日志后发现connect ETIMEDOUT是网络代理问题,我们将PicGo设置-设置代理和镜像地址中填上猫猫的端口即可:上传代理:http://127.0.0.1:7890
1
2
3
4
5
6
7
8
9
10
"method": "PUT", "url": "https://api.github.com/repos/frecoder007/pictures/contents/ska5.png", "statusCode": 0, "message": "connect ETIMEDOUT 20.205.243.168:443", "stack": "Error: connect ETIMEDOUT 20.205.243.168:443\n at TCPConnectWrap.afterConnect [as oncomplete] (node:net:1146:16)", "response": { "status": 0, "statusCode": 0, "body": "" }
此时测试发现正常上传,无论开不开代理都能正常上传。
之后更改Typora的偏好设置,设置插入图片时自动上传,选择图像-上传服务-PicGo app并选择安装路径即可。
如上传图片失败,可以手动右键图片上传或者在Typora的格式-图像中上传本地图片。
代码块故障修复
参考该博客 的解决办法。在matery.css文件中添加暗色背景来解决此问题。更改../themes/hexo-theme-matery/source/css/matery.css文件中的相关代码如下:
1
2
3
4
5
6
7
8
9
10
pre { padding : 2rem 1rem 1rem 3rem !important ; margin : 1rem 0 !important ; background : #272822 ; overflow : auto; border-radius : 0.35rem ; tab-size : 4 ; }
行数与高亮问题参考此Github issue 配置即可。更改根目录下的_config.yml文件相关代码如下
1
2
3
4
5
6
7
8
9
10
11
12
13
syntax_highlighter: prismjs highlight: enable: false line_number: true auto_detect: false tab_replace: '' wrap: true hljs: false prismjs: enable: true preprocess: true line_number: true tab_replace: ''
链接永久化
由于个人文章内容不断更新,文章标题也会发生一定的更改,为了不影响已经被引用的文章链接,故选择创建永久链接的方式生成文章的唯一标识符,这样通过该链接能唯一定位到对应的文章。
安装插件:Git Bash中输入命令npm install hexo-abbrlink --save
调整根目录的_config.yml,添加以下代码
1
2
3
4
5
6
7
8
9
10
11
12
13
abbrlink: alg: crc16 rep: hex
并修改该文件内的premalink值:permalink: posts/:abbrlink/或者permalink: posts/:abbrlink.html,根据自己喜好选择一种链接样式即可。
实际工作流程为引入abbrlink插件后,hexo g的时候会根据当前md的标题和时间生成唯一哈希映射值,添加到对应md文件中的Front-matter中作为唯一标识符。局限性是crc16算法仅支持65536个哈希值,不过插件在生成文章标识符的时候遇到相同值会尝试更换到不同值。
站内字体美化
本站采用的衬线字体为思源宋体,经查询该字体为开源免费,详情请见此链接 。如您喜欢该字体,可参考此教程 美化您的网站。
站内滚动条美化
由特仑苏 大佬提供,博客页3.4
在themes\hexo-theme-matery\source\css\matery.css中添加如下代码,可根据自己的主题修改颜色代码。
1 2 3 4 5 6 7 8 9 10 11 12 13 14 ::-webkit-scrollbar-thumb { background-color : #FF2A68 ; background-image : -webkit-linear-gradient (45deg ,rgba (255 ,255 ,255 ,.4 ) 25% ,transparent 25% ,transparent 50% ,rgba (255 ,255 ,255 ,.4 ) 50% ,rgba (255 ,255 ,255 ,.4 ) 75% ,transparent 75% ,transparent); border-radius : 3em ; } ::-webkit-scrollbar-track { background-color : #ffcacaff ; border-radius : 3em ; } ::-webkit-scrollbar { width : 8px ; height : 15px ; }
添加博客趣味标题
参考BlueSky01st 的做法。在博客的主题文件(路径为themes/matery/layout/layout.ejs)中添加如下html代码。
1
2
3
4
5
6
7
8
9
<script type="text/javascript"> var OriginTitile = document.title, st; document.addEventListener("visibilitychange", function () { document.hidden ? (document.title = "你不要我了嘛~", clearTimeout(st)) : (document.title = "✧谢谢你回来~", st = setTimeout(function () { document.title = OriginTitile }, 3e3)) }) </script>
在html中相关类似代码如下:(本质一样)
1
2
3
4
5
6
7
8
9
10
11
12
13
14
15
16
17
18
19
20
21
<!DOCTYPE html > <html lang ="zh-CN" > <script > <link id="favicon" rel="shortcut icon" href="//common.cnblogs.com/favicon.svg" type="image/svg+xml" /> var OriginTitile = document .title ; var titleTime; document .addEventListener ('visibilitychange' , function ( if (document .hidden ){ document .title ='你不要我了嘛=7=' ; clearTimeout (titleTime); }else { document .title = '我喜欢你啊' ; titleTime = setTimeout (function ( document .title = OriginTitile ; }, 2000 ); } }); </script > </html >
标题大小自适应设备
参考涓涓细流博客 更改matery/source/css/matery.css文件
1
2
3
4
5
6
7
8
9
10
11
12
13
14
15
16
17
18
19
20
21
22
23
24
25
26
27
28
29
30
31
32
33
34
35
36
37
38
39
40
41
42
43
44
45
46
47
48
49
50
51
52
53
54
55
56
57
58
59
60
61
62
63
64
65
66
---------------------------- source /css/matery.css ---------------------------- @media only screen and (max-width : 601px ) { .container { width : 95% ; } header .brand-logo .logo-span { font-size : 1rem ; } .bg-cover .title { font-size : 3rem ; font-weight : 700 ; line-height : 1.85em ; margin-bottom : 20px ; position : relative; } } @media only screen and (min-width : 600px ) and (max-width : 992px ) { .container { width : 90% ; } header .brand-logo .logo-span { font-size : 2rem ; } .bg-cover .title { font-size : 4rem ; font-weight : 700 ; line-height : 1.85em ; margin-bottom : 20px ; position : relative; } } @media only screen and (min-width : 993px ) { .container { width : 85% ; max-width : 1125px ; } .post-container { width : 90% ; margin : 0 auto; max-width : 1250px ; } header .brand-logo .logo-span { font-size : 2rem ; } .bg-cover .title { font-size : 4rem ; font-weight : 700 ; line-height : 1.85em ; margin-bottom : 20px ; position : relative; } } 来源: 涓涓细流 文章作者: 陈尚 文章链接: https://chen-shang.github.io/2019 /08 /15 /gong-ju-kong/hexo/hexo-theme-matery-zhu-ti-you-hua/ 本文章著作权归作者所有,任何形式的转载都请注明出处。
背景动态线条
在themes/hexo-theme-matery/layout/layout.ejs文件中添加如下代码:
1
2
3
4
<!--动态线条背景--> <script type="text/javascript" color="122 103 238" opacity='0.7' zIndex="-2" count="200" src="//cdn.bootcss.com/canvas-nest.js/1.0.0/canvas-nest.min.js"> </script>
部署游戏项目
见此博客 ,留作备份用,暂不添加此功能。
音乐播放器精修
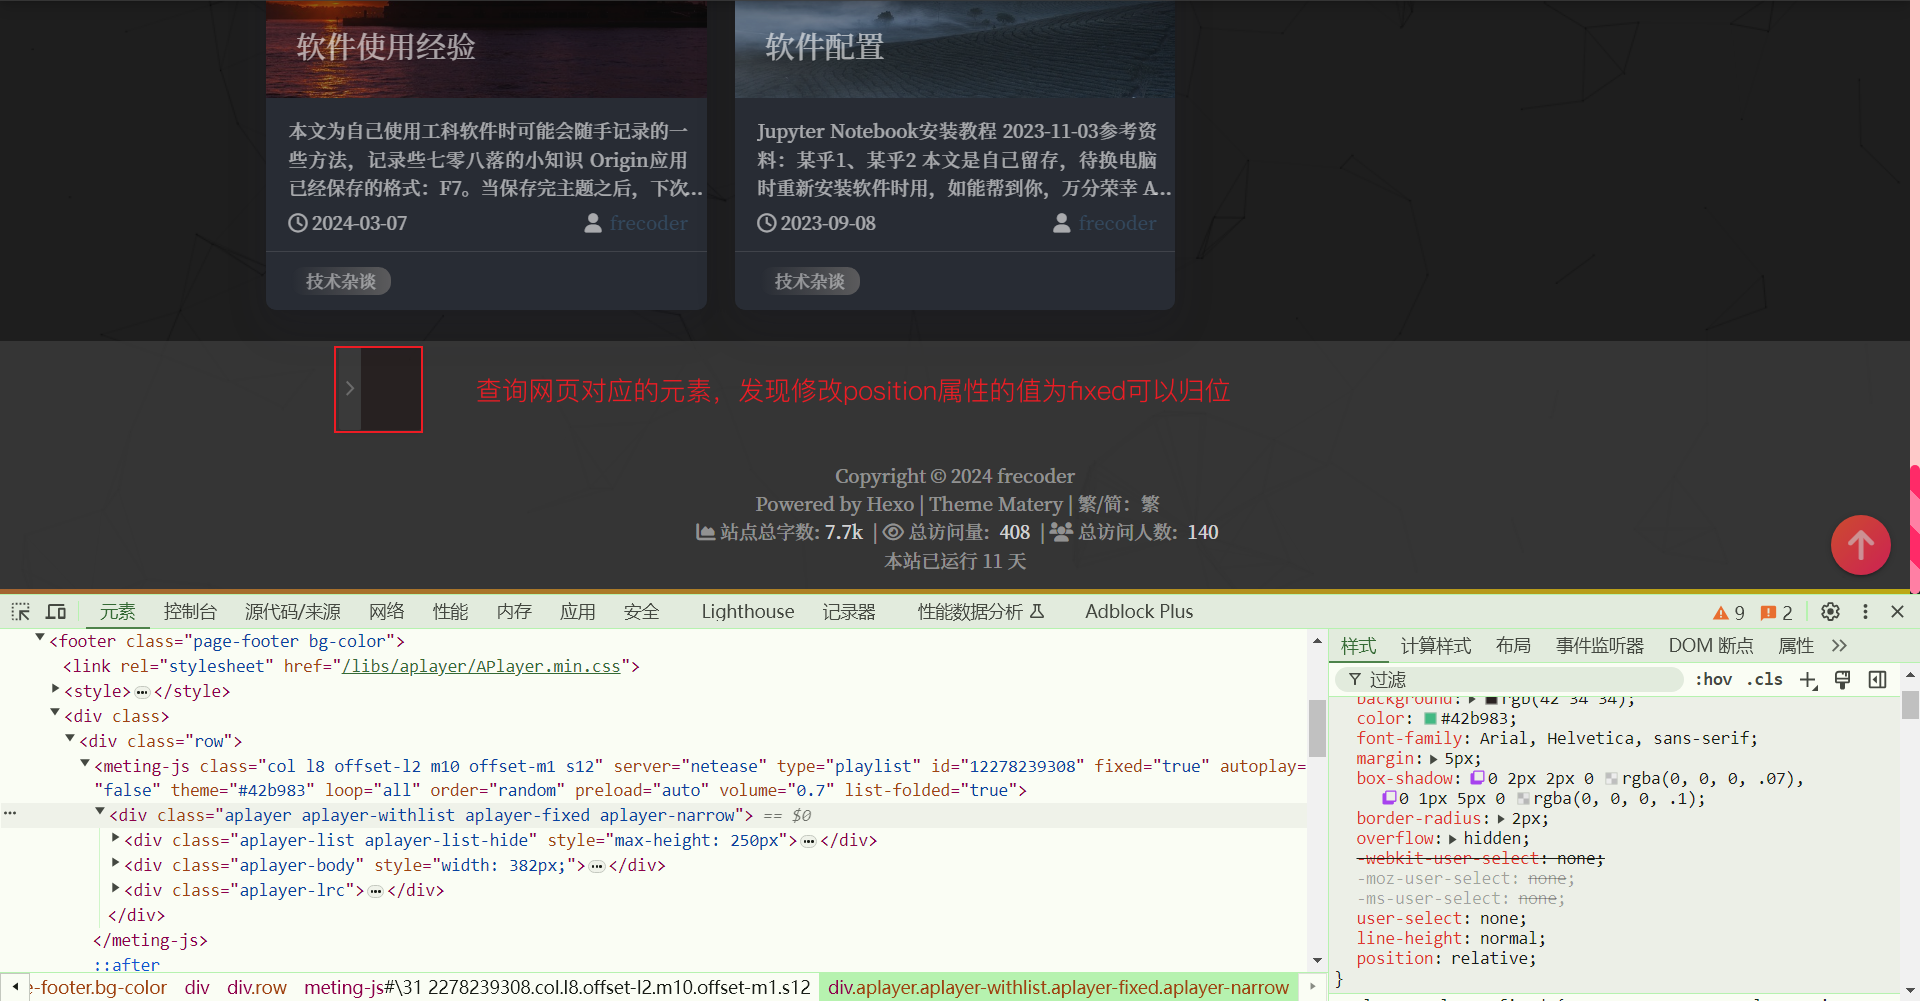
起因是发现博客在黑夜模式下播放器位置发生偏移,导致底部高出了一大截,非常难看,猜测黑夜模式开发者和原版不同,导致代码风格有差异。因此使用F12工具翻找对应元素,到右侧检索到的dark.css文件中修改样式即可,修改后黑框位置发生移动。
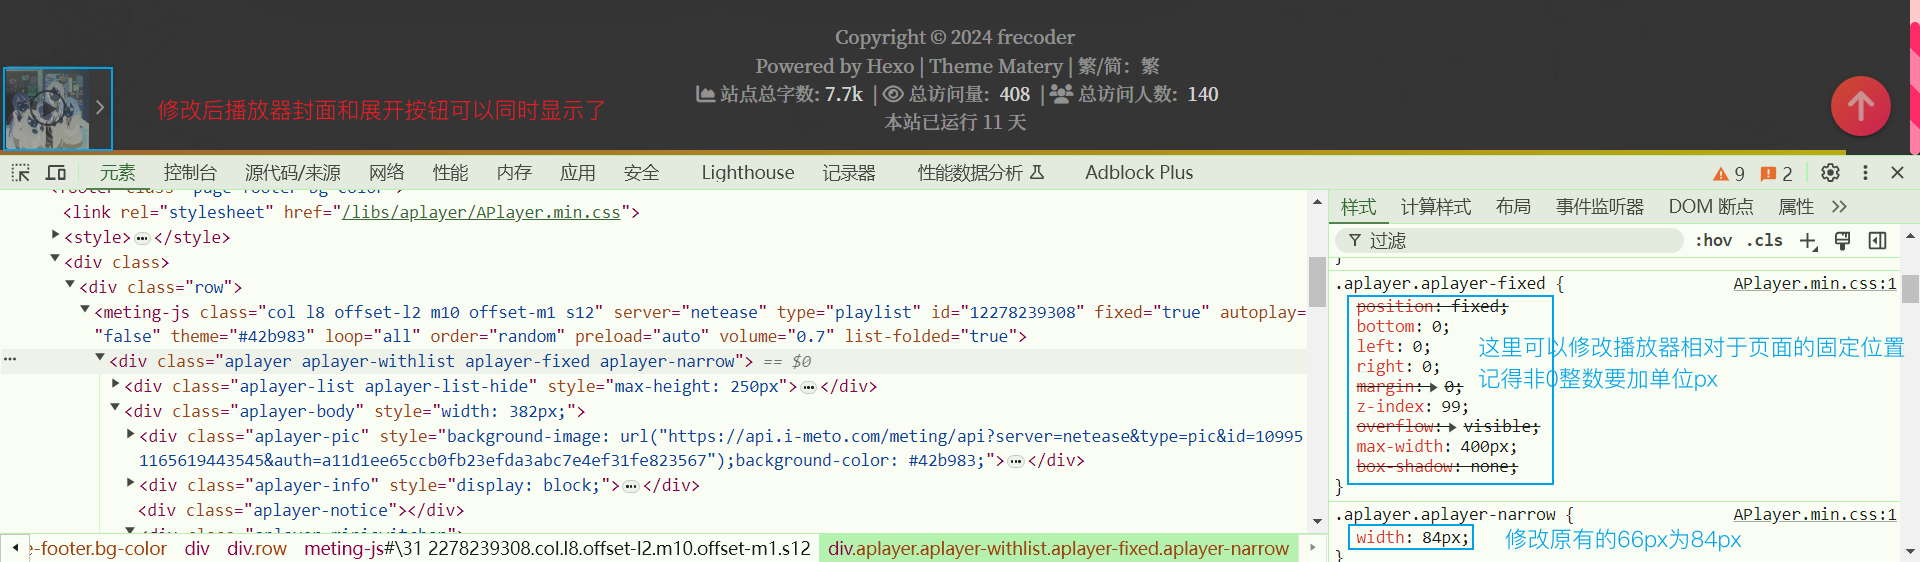
发现鼠标移到展开箭头后,黑框大小无法容纳箭头,因此再修改黑框的大小属性。查询属性发现展开箭头宽18px,封面图66px,因此修改为84px
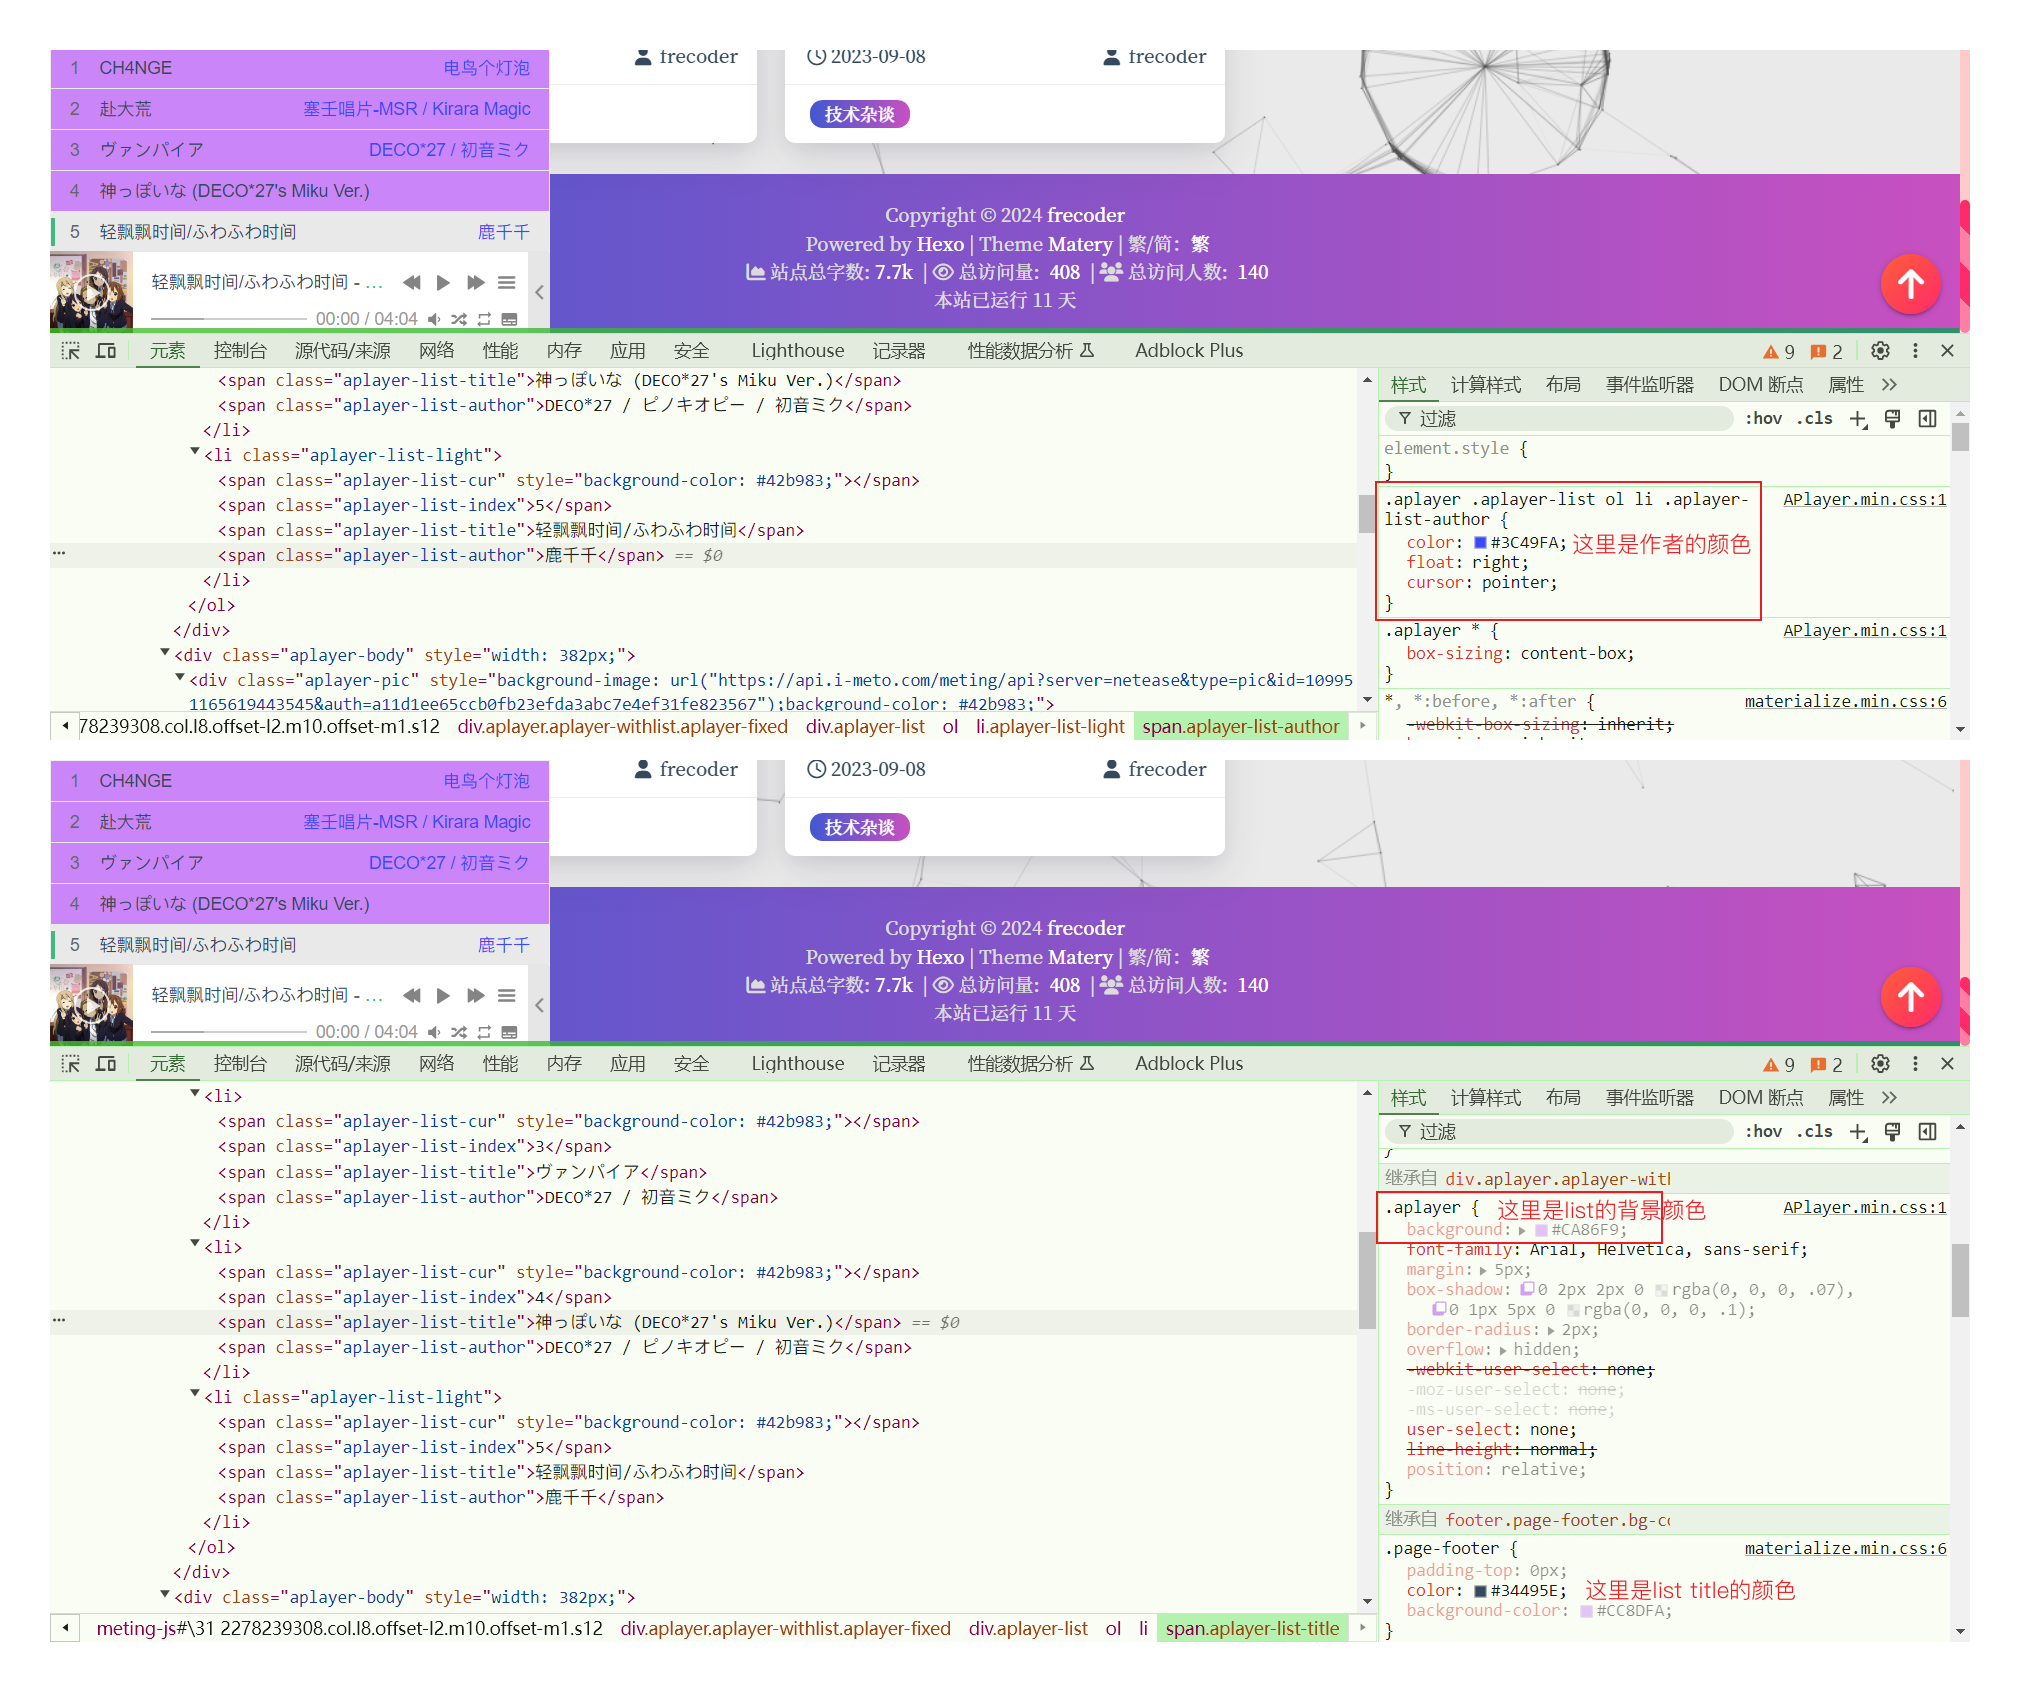
之后就是黑夜模式下,播放器的格式出现了问题,因此将图中参数改为0即可。
最后,白天模式下,部分字体采用的仍然是白色,很难辨识,因此对字体和list背景进行了修改,如下图:
这样我们就完成了播放器的美化了!虽然不一定有人会用这个功能,但是美化终归是能治好强迫症的。

 微信
微信 支付宝
支付宝